Setting Up Reverse Proxy Using NGINX Proxy Manager


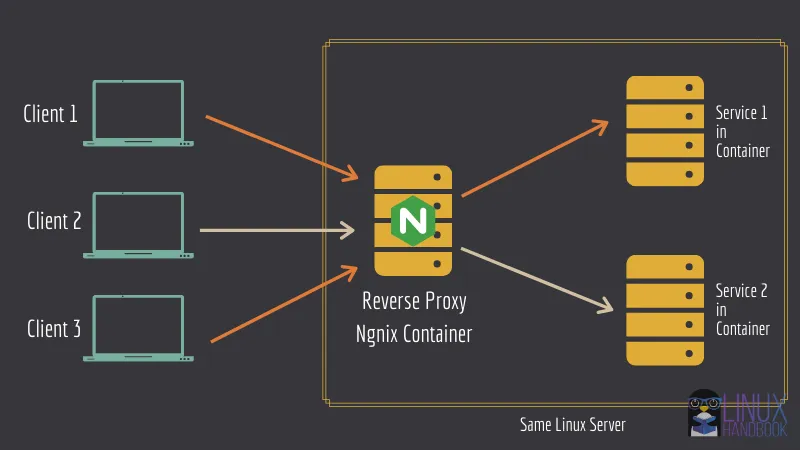
A reverse proxy is a type of server that sits in front of a group of servers and directs client requests to the appropriate backend server. This can be useful for a variety of reasons, such as load balancing, SSL termination, or simply to direct traffic to different servers based on the request.
One tool that can be used to set up a reverse proxy is NGINX Proxy Manager.
NGINX Proxy Manager is an open-source, web-based GUI that makes it easy to manage and configure NGINX and NGINX Plus as a reverse proxy. In this blog post, we will walk through the steps of setting up a reverse proxy using NGINX Proxy Manager.
Step 1: Install NGINX Proxy Manager
The first step in setting up a reverse proxy using NGINX Proxy Manager is to install the software. There are a few different ways to do this, but the easiest is to use Docker.
To install NGINX Proxy Manager using Docker, first make sure that you have Docker and Docker Compose installed on your system. Then, create a directory for the NGINX Proxy Manager files and navigate to it in the terminal. Inside this directory, create a file called "docker-compose.yml" with the following contents:
version: "3"
services:
  app:
    image: 'jc21/nginx-proxy-manager:latest'
    restart: unless-stopped
    ports:
      # These ports are in format <host-port>:<container-port>
      - '80:80' # Public HTTP Port
      - '443:443' # Public HTTPS Port
      - '81:81' # Admin Web Port
      # Add any other Stream port you want to expose
      # - '21:21' # FTP

    # Uncomment the next line if you uncomment anything in the section
    # environment:
      # Uncomment this if you want to change the location of
      # the SQLite DB file within the container
      # DB_SQLITE_FILE: "/data/database.sqlite"

      # Uncomment this if IPv6 is not enabled on your host
      # DISABLE_IPV6: 'true'

    volumes:
      - ./data:/data
      - ./letsencrypt:/etc/letsencrypt
Next, run the following command to start the NGINX Proxy Manager container:
docker-compose up -dThis will start the NGINX Proxy Manager container but if you want to have your own Database, you can edit the above docker compose file and add db username/passwords etc.. The NGINX Proxy Manager container will be available at https://localhost:81
Step 2: Configure the Reverse Proxy
Now that NGINX Proxy Manager is installed, we can begin setting up the reverse proxy. To do this, open a web browser and navigate to https://localhost:81. You should see the NGINX Proxy Manager login screen.
Log in using the default username and password, which are "admin" and "password" respectively. Once logged in, you will be taken to the dashboard.
To set up the reverse proxy, click on the "Proxies" tab in the menu on the left. This will bring up a list of existing proxies. To create a new proxy, click the "Add Proxy" button.
On the "Add Proxy" screen, you will need to enter the following information:
- Domain: The domain name that you want to use for the reverse proxy. For example, if you want to use "example.com" as the domain, enter "example.com" here.
- Subdomain: The subdomain that you want to use for the reverse proxy. If you want to use "www" as the subdomain, enter "www" here. If you want to use the root domain (e.g. "example.com"), leave this field blank.
- Target URL: The URL of the backend server that you want to proxy requests to. For example, if you want to proxy requests to "http://localhost:8000", enter "http://localhost:8000" here.
- SSL: Whether or not you want to use SSL for this proxy. If you want to use SSL, select "Yes" and enter the necessary SSL information. If you do not want to use SSL, select "No".
Once you have entered all of the necessary information, click the "Add Proxy" button to create the reverse proxy. The proxy will now be active and any requests to the specified domain and subdomain will be forwarded to the target URL.
Conclusion:
In this blog post, we have walked through the steps of setting up a reverse proxy using NGINX Proxy Manager. By using NGINX Proxy Manager, it is easy to set up and manage a reverse proxy, which can be useful for a variety of purposes such as load balancing, SSL termination, and directing traffic to different servers based on the request.